Lone Echo 2: Research Facility
Level Design | Puzzle Design | Encounters


Level Overview
The Research Facility is a narrative-driven exploration level in Lone Echo II, a VR title developed by Ready At Dawn for Oculus. The level balances tension and sorrow, depicting the remnants of the last human survivors who fell to the bio-mass outbreak.
As Level Designer and Pod Leader, I was responsible for shaping the overall flow, spatial composition, and pacing of the environment while collaborating with artists, writers, and gameplay designers to deliver a cohesive and emotionally grounded experience.
My focus was on building tension and discovery through controlled sightlines, traversal puzzles, and environmental storytelling that emphasized the game’s core themes of isolation and human connection.
Key Contributions
-
Level Ownership: Led the full design process for the Research Facility, from initial concept and paper layout through blockout and final in-game implementation.
-
Cross-Discipline Leadership: Managed a pod of environment art, narrative design, lighting, and systems design to maintain consistent vision and alignment across gameplay and visual goals.
-
Gameplay Integration: Designed puzzles and encounters that reinforced narrative pacing and core mechanics.
-
Iteration & Polish: Conducted playtests and integrated feedback to refine player flow, readability, and emotional pacing throughout the level.
Level Layout
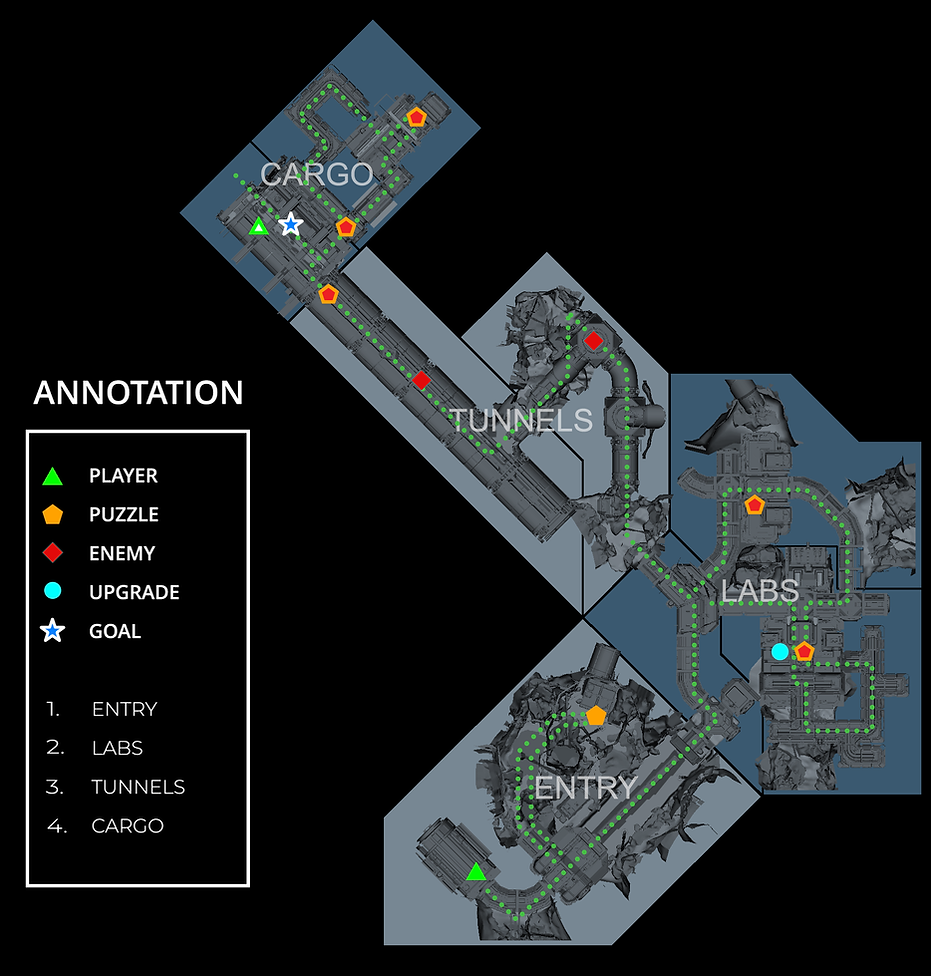
Level Walkthrough

Area 1: Entry Cave
Player enters the facility by tram but is blocked by an unpowered gangway, leading them through the caves to restore power, reactivating the gangway and the dangerous bio-mass within.
1A - Gangway
-
Player arrives on the tram platform and finds the gangway offline, establishing a clear objective.
-
Exploration guides the player to an airlock that leads into the caves.
-
Puzzle: In the caves, the player uses a manual control puzzle to connect and power the gangway.
-
Restoring power lights the glass corridor, signaling access while also awakening the bio-mass and increasing the danger within the facility.


Environment Art: Gabriel Cervantes
Lighting: Dushyant Agarwal
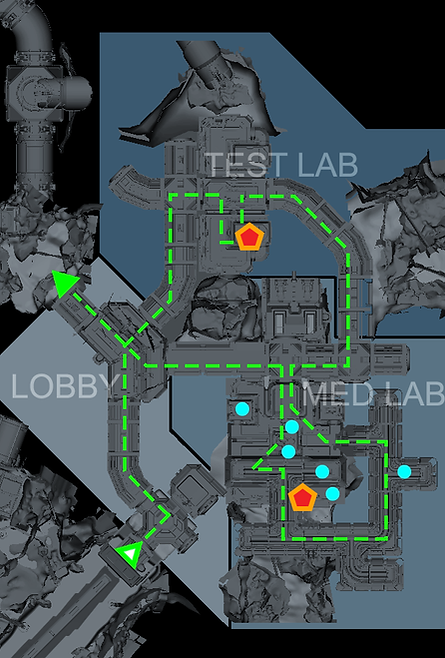
Area 2: Lobby & Labs
Player enters the facility by tram but is blocked by an unpowered gangway, leading them through the caves to restore power, reactivating the gangway and the dangerous bio-mass within.
2A - Lobby
-
Security checkpoint and lobby establish tone through visual storytelling, showing full bio-mass infestation.
-
Lobby connects to test labs, medical labs, and the tunnel airlock, defining a clear hub layout.
-
Attempting to reach the tunnels triggers a reactive “creep web” that seals the doorway, redirecting the player toward the labs to find a way through.
2B - Test Lab
-
Player discovers containment cells where webs are being studied under controlled conditions.
-
Puzzle: Player operates an armature-mounted cloak emitter to neutralize the webs, introducing the mechanic through a light tutorial.
2C - Med Lab
-
Puzzle: Player must navigates vents and cells filled with victims encased in bio-mass, reinforcing tone and environmental storytelling.
-
Upgrade: Scanning dead medical robots (6) provides data to create a portable cloak emitter, granting new player ability.
-
With the emitter equipped, the player can return to the lobby and bypass the bio-mass blocking the tunnels.


Environment Art: Ash Thundercliffe, Gabriel Cervantes
Lighting: Dushyant Agarwal

Area 3: Tunnels
With the cloak emitter equipped, the player enters the tunnel network beneath the facility, navigating dark, infested passages on the way to the cargo bay where a stasis container of bio-mass “ticks” awaits.
3A - Upper Tunnels
-
Player uses the cloak emitter to bypass the web sealing the tunnel airlock.
-
Player navigates dark, open tunnels with limited visibility and environmental tension, used headlamp.
-
Tick: Player encounters the first patrolling tick, learning to time cloak pulses to survive or be killed.
3B - Containment Conveyors
-
Tick: Player follows damaged conveyor lines leading down toward the cargo bay, avoiding or cloaking loose ticks along the route.
-
Puzzle: Player reaches a large creep web variant with four energy nodes - too many to cloak; learns to cloak the nearby power source instead of the web itself to clear the path and exit the Tunnels.


Environment Art: Gabriel Cervantes
Lighting: Guillaume Deschamps-Michel
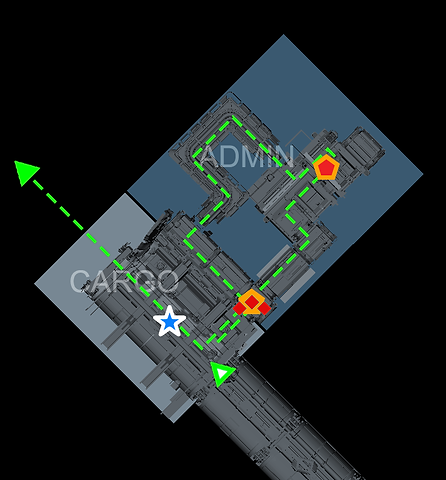
Area 4: Cargo & Admin
Player reaches the cargo bay where the target container awaits. Opening the cargo doors requires solving energy-based puzzles, avoiding ticks, and navigating the overrun admin area to restore access.
4A - Cargo Bay
-
The target container sits in clear view at the center of the cargo floor, signaling the player’s goal.
-
Cargo doors are sealed, directing the player toward the control room in the admin area.
-
Puzzle: Several ticks feed on the airlock’s power source, blocking entry. The player uses a powered gantry arm to lure the ticks away from the airlock, creating a safe path forward.
4B - Control Room & Admin
-
Player opens the cargo doors from the control room, triggering a web that seals them inside.
-
The web’s sensor node is located beyond the control room, requiring the player to venture deeper into admin to progress.
-
Puzzle: Player solves a battery and web challenge while uncovering tragic environmental storytelling tied to the bio-mass outbreak.
-
Goal: With the web disabled, the player returns to the cargo bay and rides the recovered container via drone transport back to the space station hub.


Environment Art: Rhonda Chan
Lighting: Guillaume Deschamps-Michel
Pacing & Tension

Pre-Production
Pre-production began with one-page briefs outlining gameplay goals, intended experience, and dependencies for each section of the Research Facility. I then collaborated with art and visual development to establish the level’s tone and theming, followed by narrative and design alignment to map pacing, tension, and story beats. The process culminated in iterative blockouts, progressing from rough spatial tests to refined greybox and whitebox passes to ensure a cohesive vision across gameplay, art, and narrative.
01: One-Page Briefs
I began pre-production by drafting one-page briefs in collaboration with the game directors and story team for each of the four sections of the Research Facility. These briefs outlined the gameplay goals, intended player experience, and key dependencies, serving as concise, accessible references for the wider team.
Each section was assigned a bronze, silver, or gold tier to define production scope and budget priority. Unlike full level design documents, these briefs functioned as quick-reference tools for cross-discipline pods, focusing on essential information without the granular details intended solely for level designers.


02: Art & Vis-Dev Collab
Working with environmental concept artists and the visual development team, I helped establish the thematic foundation of the level - a blend of man-made industrial structures hollowed into asteroids, now overgrown with bio-mass outbreak. The tone was intentionally uneasy and clinical, blending medical and mining motifs to create a chilling atmosphere.


Concept Art: Cody Foreman
03: Narrative & Paper Design
Next, I collaborated with the Narrative Design and Directors to define pacing and tentpoles for both story and gameplay, mapping tension curves, emotional beats, and traversal flow across the level’s major sections. This process helped inform the paper design layouts, which established story beats and gameplay moments to ensure the level’s flow felt cohesive and intentional.

The Research Facility’s design followed a structured blockouting process tailored to the needs of this level:
-
Blockout: Established the core layout, defining spatial relationships, start and end points, and major narrative and gameplay beats to set the foundation for player flow.
-
Greybox: Introduced refined geometry using modular blockout kits, along with placeholder gameplay and story elements to validate pacing and spatial rhythm.
-
Whitebox: Integrated gameplay systems, progression logic, and visual polish to create a fully playable version ready for internal testing and iteration.
To support this process, I worked closely with the art and visual development teams to build modular blockout kits that maintained visual consistency and accelerated iteration across departments.


full map: greybox → final


entry cave puzzle: greybox → whitebox → final